Mind Maps: a Miracle Tool for Writers

This may be a long post, but I hope to keep it entertaining for both writers and non writers. Let me know what you think!

Some history – where I come from

I’ve always loved to write. As a child, I already started writing similar stories than the ones I was reading: children stories. At the time, I was left with that time’s simple tools, a pencil and pieces of paper:

Then, my father seeing that I really loved it, decided to buy me a typewriter (I unfortunately don’t have it anymore, but it was this model):

Besides the fact that it was difficult at first and hurt my fingers since the keys were so hard, it did improve the presentation of my writings by quite a bit, I even allowed myself to make ASCII art even though I didn’t know it would be called that way a decade later:

And when the occasion arose, I had to draw things myself on the paper:

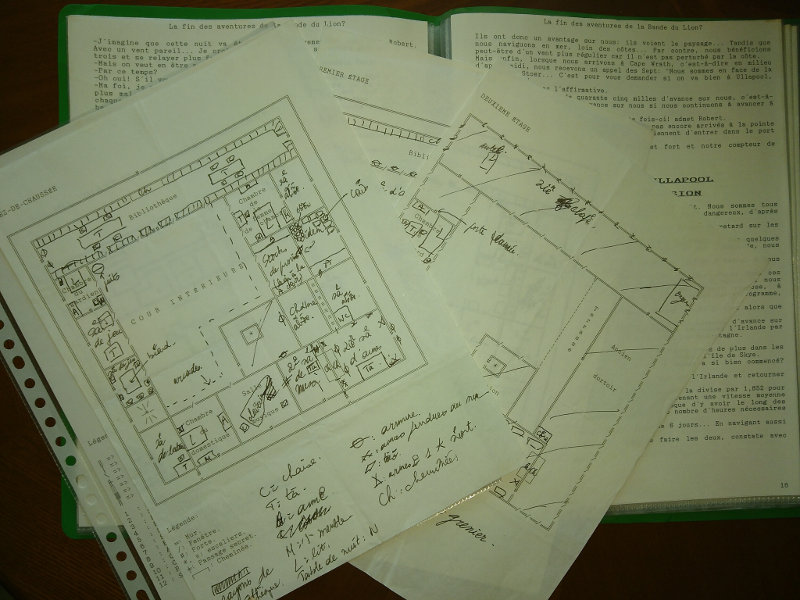
I even went as far as making fake old maps to add to the mystery of the fiction I was writing:

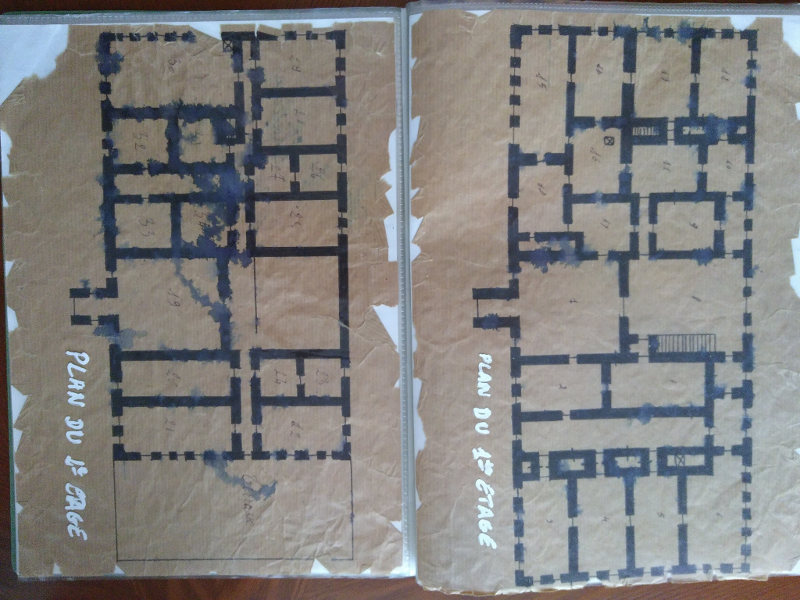
At the time, if you wanted to know about one place where your story was taking place, you basically had to go there and get some documentation:

You could also read lots of books to get a grasp of the place, its atmosphere, its inhabitants and culture, etc. You had to be a real detective.

Then my parents decided that it was time for me to have a computer,

This thing was top notch at the time, it had no hard disk and everything had to be on floppy disks which weren’t so reliable. It was a great improvement on the typewriter, though, and soon MSDOS had no secrets for me. I added a 20 Mb (yes, megabytes) hard disk later which cost me an arm and a leg at the time… I could use Word 2.0 to write, it was great. You could FIX things without typing back a full page! And then, PRINT it and write gibberish on it as much as you wanted to!

Great times. Believe it or not, I still have the files for these books.

Since then, and that’s like 30 years now, nothing much has changed when it comes to the comfort of writing. Of course, you can now travel the world from your desk by watching videos and reading traveler blogs, there is more material around than you can handle anyway.

But the writing, technically? Good ol’ Word. Ah, Libre Office has come around so that you don’t depend on a private company anymore, but that’s pretty much all there is to it.

Of course, in the more recent years, self-publishing has enabled anyone to publish books, while publishing anything was practically impossible before unless an editor accepted to support you.

Tools and Constraints

There are some tools for professional writers. I won’t quote them here because I don’t want to rant, but the added value doesn’t compensate for their price, at least that’s my own opinion.

As a writer, I have quite a number of needs in order to write efficiently:

  • describe the characters in my story, have their personality and picture at hand whenever I need it,
  • describe the places where my story happens, possibly along with pictures, maps or drawings,
  • dynamically design the plot in the most flexible way possible, by quickly arranging events and/or themes seamlessly,
  • have an overview of the entire book the whole time to see where I stand,
  • count words inside chapters to make sure they are roughly balanced (Word documents count the total words of the document, they don’t break the counts into chapters),
  • handling of Table of Contents, presentation of the book, references, footnotes, etc., should be easy and not troublesome, in fact you should never even think about those as it would distract you from writing,
  • navigate efficiently through the book with shortcuts rather than having to scroll pages and pages to reach one chapter,
  • have the finished product in the form of an epub and various pdf formats (one for reading on a screen, one for a small paperback edition with small characters and at least one for a big paperback edition for people with poor vision),
  • manage to have a history of changes.

Frankly, none of the current software can deal with all these constraints easily. Word/LibreOffice documents are a nightmare. LaTeX constantly distracts you from the contents and doesn’t provide an easy way to navigate through the whole document (I wrote my PhD using LaTeX).

Mind Maps are the Perfect Tool

In the meantime, as a computer engineer, I started using Mind Maps at work to organize ideas. Scientific, computer-related ideas.

If you don’t know what a Mind Map is, it’s just a simple tree of ideas such as this:

You organize your ideas in nodes which are broken into smaller nodes as you refine your ideas. These are great for technical planning and thinking.

Some day, I started planning a new book inside a mind map. Just to draw the basic canvas of the story. Then I added my characters into it.

The main plot was in front of me, the characters next to it. Why not write the book inside the mind map? I know that, as soon as you start breaking your ideas into different documents, some of these documents will become out of date very quickly. By writing directly inside the mind map, I had only one document to maintain.

Most Mind Mapping software allows to type some HTML notes inside every node, that’s where I typed the main text of the book. And because it’s HTML, I can add images, put some formatting, bold, etc.

Converting a Mind Map to PDF and EPUB

To my knowledge, there is no converter to create a PDF or an EPUB from a Mind Map. If you think about it, a Mind Map is a simple text document that can be easily parsed, in the meantime libraries to generate PDFs exist, while an EPUB is a simple Zip file with some HTML files inside.

So I wrote a converter in Java, which also counts the number of words in every chapter and sub-chapter.

Thanks to this, I can easily:

  • have everything in one place with all I need visible in one document: the characters and locations along with the basic ideas, the whole book where chapters are nodes and sub-chapters are sub-nodes, and the nodes’ contents is the text of the book itself, so it’s extremely fast and easy to navigate from one part of the book to another,
  • navigate from a character to a given chapter with a simple mouse click,
  • move ideas, events, plots around during the planning phase, while developing characters and locations in the same document,
  • count words in every chapter and sub-chapter with my converter to make sure that things are not totally out of balance,
  • have one single source file for many output formats for the readers, which are even described in the Mind Map,
  • Mind Maps are text files, it is easy to compare a file with a previous backup to see what has changed.

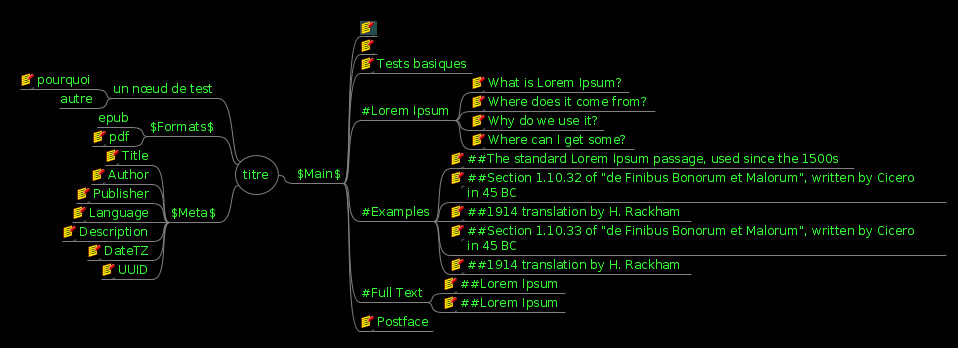
Here is an example of a test mind map that is later transformed into a book (nodes with a yellow icon have notes typed into them):

The generated PDF looks like this:

And the generated Epub is readable on any reader, uploadable to any self-publishing platform.

I hope this converter can help other people as well. Note that its current version as I write this article is rather limited but is perfectly suitable for a simple novel. Its limitations are listed in the description of the tool itself on gitlab.

Did you like this? Let me know in the comments below!

Moon Tests with a CCD Camera

Following up with the pictures of the moon taken with a Nikon camera on a 114mm Newtonian telescope, I have recently bought a quite cheap CCD camera. There are a few advantages and a few drawbacks.

Here are the qualities of the CCD:

very easy to mount directly on the telescope
directly exposed to the object without any extra lenses
instant results on the computer screen with a large view of objects in full screen

need to have a computer around (along with the brightness of the screen that can have an impact on your night vision)
no possibility of playing with contrast/exposure time since it is a cheap camera, you have to rely on the automatic settings, some more expensive ones do have these kinds of settings, but that’s definitely another budget

And here are the qualities of a full camera:

playing with contrast/exposure time depending on the object you’re trying to take – the moon and a deep sky object will definitely not want the same settings

mounting the camera on the telescope is not difficult but needs some precautions
having to go through at least an eyepiece and a refractor can create a lot of chromatic aberrations and distortions, as seen on the pictures in that post (look out for a blue halo around the moon or around the craters, for instance) compared to the ones in this current post.
the weight of the camera can be an extra load on the telescope’s mount, especially if the mount is already reaching its limits with the tube on its own

So finally, here are two sample pictures taken on the same telescope:

Note that those pictures were taken from my balcony, right in the middle of the city, and all astronomers know that this is the worst setting to do any kind of viewing and especially any kind of photography.  The thing is that you won’t realize what this really means until you see this video (2Mb):

See the wobbling? That’s the air heated unevenly that moves around. It somehow totally reminds me of what you see when you look at the bottom of a very very still pool filled with water, look at this one:

Isn’t that simply amazing?

Learning words in foreign languages

Recently I was asked how many times you should hear a word in a foreign language before it really sticks into your mind.

Sometimes, hearing/reading one word one single time in the right context will imprint it into your mind forever. And sometimes, you will repeat one word 100 times and it will not stick. Spaced repetition is a powerful way to get the words to stick while reducing the number of times you are exposed to each word, but it is not magical either. With the wrong context, you may also fail with spaced repetition.

I learned one thing from decades of studying, it is that context is everything. That’s why trying to immerse yourself in a certain context while learning a language is important. The best of all is to simply be in the country of the language you’re learning. But as it is not always possible, here are a few tricks.

When I use Anki to do spaced repetition, I listen to some music in the language I’m learning while repeating the words. This switches the brain into the mode “oh, that’s this language, okay!”, as well as cheering you up and setting up a mood. You might even want to tap your feet with the rhythm while learning words. And on all my cards, I have an image of something that is characteristic of the country/ies where that language is spoken, as well as some sentences in which the word is used – because learning a word by itself is boring, and learning it within a sentence makes it more interesting. I will make a post later to explain how I did it technically. Associating a picture with the word also helps quite a bit, especially for physical objects.

Teachers know that bored students don’t learn anything. That’s why teachers who make their classes very emotionally alive are more successful than others. There are some very serious scientific studies on this but I’m sure you have in your own experience that teacher who stood above all others because his classes were so lively, funny or exhilarating.

And of course it all depends on the language you’re learning and the language(s) you already know. The learning curve of Japanese or Arabic is obviously much greater for a native monolingual English speaker than the one of German for someone who knows Dutch and Danish.

So there is no “number of times for a word to stick”, it’s all about context!

The Moon

The Moon is back with its normal non-eclipsoid figure. 😀

Here is a picture taken with a Nikon D5100 mounted with a simple Barlow on a Celestron 115/910. I’ve had both the telescope and the camera for a long time now, but never took the next step of taking pictures. Thanks to the recently acquired barlow, this is a dream come true.

This is taken from a balcony in the middle of a big city, not exactly your ideal conditions for taking pictures of the sky especially during a hot summer with lots of temperature differences, but the results are still quite good and I have not applied any software fix on them. Exposure: 1/200 s, sensitivity 1000 ISO. Enjoy!

Note the difference in chromatic aberrations depending on the location of the details mostly due to the barlow lens, the following animation shows the same details taken in the center of the picture compared to the edge (1/100 s, 400 ISO):

Moon Eclipse + Mars / 2018-07-27

The sky was kind enough to let us see the moon eclipse yesterday for a short time, as it was quite cloudy. A very nice experience.

Of course, without forgetting its friend Mars (take your time, it’s an animation) :

The clouds also allowed for some creepy shots, you’d wonder if Freddy Krueger was around.


Note that these are raw photos. No filters.

Backups / Part 1

You have precious data

In this digital era, we all have data that we care about. You certainly wouldn’t want to lose most of your earliest baby pictures. 😀

That data is very diverse, both in its nature and in its dynamism. You have static backups such as your baby pictures, but also very dynamic data such as your latest novel. You also have a lot of data that you probably don’t want to back up at all, such as downloaded files and programs. Well, if those files are actually your bank statements, you may want to have a backup in case something goes awfully wrong.

Things go wrong sometimes

Many people store their “stuff” on their computer, and that’s about it. Then one day, the computer crashes. Bad news, the hard disk is dead. Woops.

The thing is, hard disks fail. In 30 years of dealing with computers on a daily basis, I’ve experienced on average one hard disk failure every 2 years, and I don’t even mention the countless floppy disks that died in my hands. 😀 Maybe I’m unlucky.  Maybe I use computers too much.

Regardless, I know people around me who also experienced hard disk failures and were not prepared for them. Some of them took it well, invoking destiny, others didn’t take it so well. But in any case, when it comes to data loss, destiny can be bent. And although I’ve had mostly hard drive failures, SSDs fail too, and in an even worse way since they generally give very little warning signs (if any) and the whole disk is gone at once, whereas on traditional hard drives it may still be possible to retrieve some of the data. USB keys and SD cards are no exceptions, I’ve found they fail quite often, even the ones from established brands.

Most of the time, trained and highly skilled professionals can recover most of the data using specialized equipment. For some examples of what is possible, you can check out this video channel of a very talented data recovery expert for amazing videos. But that comes at a cost. And recovering everything is not always possible.

You can cheat destiny with redundancy!

The good thing about computers is that, unlike paper data, digital stuff can be copied over and over, and that process is very easy and lossless. You just need to use this capability!

The first step towards minimizing the risk of losing data because of a hard disk failure is to set up a RAID (Redundant Array of Independent Disks). The basic idea is to spread your data and duplicate it on several disks, so that if one fails, your data is still on the other disks and you have cheated destiny. We will cover that in the second part of this series.

Redundancy Is Not A Backup

But keep this motto in mind: “Redundancy Is Not A Backup”. You have your array of disks and you can be sure now that even if one hard disk fails, you are still safe. Now, what if a second hard disk fails just after that? What if a power surge fries all your disks? Hardware failures happen, sometimes of something else (motherboard, SATA controller, etc) that even corrupts your data like it happened to this guy. Viruses encrypt all your data and ask for a 1 million $ ransom to get it back. Human error is always possible and you may mistakenly delete some important files. What if your apartment gets robbed? What if it burns or gets flooded? And yes, it even happens to the best!

This is why, along with redundancy, you always NEED backups. You should obviously not store them anywhere near your computer, ideally not even in your home in case something bad happens there. We’ll get into more detail about this in the third part of this series.

Encrypt your backups

Last but not least, as soon as you store your backups outside of your home, then comes the problem of privacy: what if someone comes across your backup and gets access to your data? You may not care about some of it being accessed by strangers, but you will probably want to shield some of your precious files from prying eyes. That will be the fourth and last part of this series.

3D printing – part 1

I have been curious about 3D printing for a few years now but never found the time and courage to finally take the first step and buy a printer. The fact is that the prices were quite discouraging for a simple hobby, at least that’s how I saw it.

I did have some real interest in 3D printing as I actually already printed a few items through a 3D printing website, such as a camera cache for my tablet and a magnet holder for my drinking glass.

While the first one is a classic, you might wonder what the second one is for. I invite you to check the Professor Luc Montagnier’s research on water, it might give you a few clues, and this is just a little experiment of mine. Since I have been drinking that polarized water (for a few years now), I have not been sick, although there are still some things that could be improved in my lifestyle regarding health.

Anyway, back to 3D printing, the cost of delegating the printing to a 3rd party is quite prohibitive. The second piece cost a mere 30 euro + shipping. And I ordered 2 of them. You’d better not make any mistake in the design.

Then, in December 2017, I found a 3D printer kit on Gearbest on sale at 100$. I thought “What the Heck, this is the equivalent of printing 3 of my magnet holders!”. And I had many other projects in mind but I was reluctant to make them because of the inferred cost. So I just bought the printer, although I had some idea that as it was a kit it would require quite a bit of attention and time. Well, that’s an understatement.

The thing is that 3D printing is not yet for everyone. Not only as a bare kit, but also in general. Even high-end 3D printers are still having a lot of issues, from what I read on the Internet. I’m actually glad that I bought a kit:

  • it was very cheap,
  • I got to get familiar with every single part and detail of the printer,
  • if anything fails I always have a fix at hand.

The last point may be the most important of all. If you have a stock printer, when it fails and you don’t want to burn your warranty, you have to go back to the seller or the manufacturer. That’s a lot of cost, time and energy (communicating, explaining your problem, sending it to the post then waiting for it to return, etc.), when you could actually use that time to fix it yourself.

Of course, the thought of printing your own stuff is very thrilling. But do bear in mind that 3D printing is very demanding, and before jumping into it, you should know what you are putting yourself into.

Although I’ve had my printer for just 6 months, I have already printed quite a lot of things. In fact, the printer has been active for almost 2 full months:

And I have also spent some time transforming it, fine-tuning, fixing problems, etc, and it is significantly different from the original kit now:

Anyway, what I can say is that it is also very demanding, in time and energy. Many things can go wrong with that technology, especially if you start from scratch with a kit:

  • there are obviously heated parts (at least 200°C, that’s 392°F), which can be dangerous, including the hazard of burning yourself,
  • mechanical problems including bending parts,
  • precision is key, a fraction of a millimeter can make the difference between failure and success,
  • sensitive electronics (a motherboard, an LCD screen),
  • strong currents that can represent a fire hazard, especially as the basic equipment that comes with the kit is not exactly 100% safe,
  • melted plastic, with all its potential caveats (toxic gas, fluidity, adherence depending on the temperature, stuck nozzle, etc.),
  • bugs in software and firmware,
  • moving parts and wear (soldered wires coming out…), strongly vibrating parts which can cause loose screws, detached pins, etc.),
  • noise issues…

I think you may get my point by now. Every single of these aspects is sensitive enough to cause printing to fail. Just keep this motto in mind: “If it is possible for anything to fail, it WILL fail after some hours of printing.” Thus you want to have everything safely secured so that there no possibility left for it to fail.

In order to achieve this, many different skills are required:

  • feel at home with computers (obviously) and have some minimal knowledge of electronics is definitely a plus,
  • fixing mechanical parts, including very small and detailed pieces,
  • patience (that’s a big one as printing big parts can sometimes take a full day or more – my record is 37 hours),
  • being capable of soldering and making your own wire connectors,
  • unless you only want to print things that have been designed by others, 3D designing skills, so that you can take full advantage of your printer, creativity is definitely a plus here,
  • coping with the constraints inherent to 3D printing (minimal wall thickness, connection thickness and detail, as few hanging parts as possible, etc.),
  • finding an appropriate place to put the printer in your home (if you plan to print ABS you definitely want a ventilated area),
  • evaluating the physical resistance of printed pieces. This point is not a joke, especially as heat can come into play with certain materials:

In this particular case, it was a combination of underestimating the strength of the piece compared to its width and the weight it was supposed to carry, but the color with which I printed it was quite sensitive to the heat from the sun, and that was PLA. After printing it in white and a bit thicker, I don’t have any problem anymore although the temperatures in France are currently reaching 35°C.

So yes, there is a lot of fine-tuning, trial and error in 3D printing. And changing any single thing in your habits, including the filament brand or even color can break a print.

However, all this said, 3D printing is a lot of fun!

Have a look at my thingiverse page where I share pieces that can be of use by other people (which is not always the case: 3D printing is mostly about making pieces that fit exactly your own needs – not necessarily your neighbours’).

GANN-EWN / Part 5 / Applying the Neural Network trained by the Genetic Algorithm to the game EWN

If you haven’t read the previous parts, you should start at part 1.

Now that we have a Neural Network architecture and a Genetic Algorithm, we can apply them to the game “Einstein Würfelt Nicht”.

The Parameters of the Problem

There are several parameters that need to be addressed first:

  • how to feed information to the NN and how to get a result,
  • how big should the NN be, how many layers, how many neurons per layer, how many connections between each layer,
  • how to tune the parameters for the GA (population size, mutation rate, etc.).

There are some precedents for every of these 3 points (NNs as well as GAs have been studied), but there is no existing answer for this particular set of problems.

Feeding Information to the NN

The answer to the first question seems trivial, but it is actually not. The first answer that comes to mind is “just feed it the board and the die and get the stone that has to be played and the move to be played”.

This is of course a valid answer, but there are many more:

  • don’t feed the whole board, but rather the positions of the stones along with the die,
  • feed the possible moves instead of the die,
  • or you could use the network as a “value network”, in other words let the network evaluate how favorable a certain position is for the current player. In that case, the algorithm has to simulate every possible move and apply the network on every resulting board.

There are many other ways of feeding information, including feeding redundant information. For instance, you could feed the number of stones left for each player in addition to the board: that’s an information which is obviously useful and that the network could directly use rather than having to calculate it again.

Getting the NN’s Result

The Neural Network can be used to gather very different results, also depending on which information it was given as inputs. Here are a few ways that the network can be used:

  • the number of the tile to be played along with the move to be played,
  • among all the possible moves, get the index of the chosen move,
  • return one output number for each tile and each move, and play the tile that has the highest number along with the move that has the highest number,
  • if used as a value network, just return one value: the fitness of the current position.

Again, there are many ways of using a neural network to play. We could even use two networks: one to choose the tile to play, and then a second one to choose the move. Whatever we choose, we have to keep in mind two main points here:

  • the result can never be an invalid move, which is not always trivial,
  • make sure that results cannot be incoherent. For instance, a valid possibility would be to have two integer outputs: one for the tile to play on the board, one for the move to play, each of them being applied the mathematical “mod” to make sure that the results are within range. But then there might be a discrepancy between the chosen tile and the chosen move. Maybe the move made perfect sense with another tile, but not with the one that was eventually selected.

The Size of the Neural Network

I tend to reason in terms of complexity of the game to address this problem. Just think about “if I had to code a perfect player for this game, how many rules and cases would I have to take into account”.

The answer also depends on what you feed the network. If you feed it a lot of redundant information (for instance, feed it the board and the number of remaining tiles for each player), then the network will have to extract less metadata from the board.

In the case of the game “Einstein Würfelt Nicht”, I chose not to mostly not give any redundant information to the network. Given the size of the board, I believed that a simple network of just a few layers and a couple of hundred neurons would probably do the trick.

Then comes the number of connections between layers. In order to extract as much information as possible from the board, I believed that a fully connected first layer was needed – although I chose not to enforce it, but I gave a sufficient amount of connections for this to happen. So I started off with a first layer of 20 neurons, along with 500 connections between the board (which is a 25 bytes array, with an additional byte for the die). I have also tried other different variants.

The Parameters of the Genetic Algorithm

Population size, mutation and cross-over rates

I started off with a population of 100 individuals and made some tests with 200. In that population, I chose to keep a fair amount of the best individuals, 10 to 30%, without checking their scores. All the others are discarded and replaced with either new individuals, either top individuals that have been mutated and crossed-over.

As for the mutation rate, I made it randomly chosen between 1/1000 and ten to twenty per 1000. That is to say that to create a mutated individual, 1 to 10/20 random mutations are applied for every 1000 bytes of its DNA. Note that with a network of 10000 elements, that’s just a few mutations in the network. A mutation can be a change in an operation, a connection move or a change in parameters such as weight and offset.

As for the crossover rate, I made it from 0.01% to 1%. As we will see later, it wasn’t that successful in the first versions.

Evaluating players

Another important parameter is the accuracy of the evaluation for every individual. In the case of a game, it can be measured by having this individual play many games against other players. Other players may be other individuals of the population and/or a fixed hard-coded player. The more games are played, the more accurate the rating of a player. And this is getting more and more critical as the player improves: at the beginning, the player just needs to improve very basic skills and moves, it is failing often anyway, so it is easy to tell the difference between a good player and a bad one. As it improves, it becomes more and more difficult to find situations in which players can gain an advantage or make a slight mistake.

In the case of EWN, as it is a highly probabilistic game, the number of matches that are required can grow exponentially. Note that there are even a large number of starting positions: 6! x 6! which is roughly 500 thousand permutations. With symmetries we can remove some of them, but there is still a large number of starting positions despite the very simple placing rules. So even if you play 100.000 games for a player, it is still not covering the wide variety of openings. What if your player handles well those 100.000 openings but is totally lame at playing the rest? Not even mentioning the number of possible positions after a few turns.

A good indicator to check whether we have played enough games to correctly rate players is the “stability” of the ranking of players as we continue playing games. As the rankings stabilize (eg for instance the top player remains at the top for quite a long time) we are getting better and better accuracy.

Individuals selection and breeding

As I developed this and started testing it, I realized that the evolution was going very slowly: new individuals were bad in general, with only a few of them reaching the “elite” of the population. That’s because of the randomness of the alterations. We will see later how I tackled that problem.

As I was going forward in this and observing how slow the process was on a CPU, I also started planning to switch the whole evaluation process to the GPU.

GANN-EWN / Part 4 / Developing a Genetic Algorithm from scratch

Welcome to this fourth part of building Neural Networks evolved by Genetic Algorithms. If you haven’t done so yet, I would advise to read the first, second and third parts before reading this article.

Basics about Genetic Algorithms

So, what exactly is a Genetic Algorithm? The name applied to Computer Science sounds both scary and mysterious.

However, it is actually quite simple and refers to Darwin’s theory of evolution which can be summed up in one simple sentence: “The fittest individuals in a given environment have a better chance than other individuals of surviving and having an offspring that will survive”. Additionally, the offspring carries a mutated crossover version of the genes of the parents.

Given this general definition, the transposition to Computer Science is the following:

  • design “individuals” to solve a particular problem, whose parameters are in the form of a “chromosome”, most of the time a simple array of bits,
  • create a “population” of these individuals,
  • evaluate all individuals in the population and sort them by their fitness (e.g. how close they get to solving the problem well),
  • create new individuals by making crossovers and mutations on the best individuals of the current generation,
  • replace the worst individuals in the population by those new individuals,
  • rinse and repeat: go back to evaluating all individuals in the population.

With this in mind, the choice in part 3 to store our neural networks in simple arrays comes into a new light: those arrays are the chromosomes of our individuals.

Our Genetic Algorithm

The genetic algorithm I built went through several phases already.

Here is the first phase:

  1. generate n individuals, each representing a player, note that players may also be non Neural-Network-driven players or players using different types of NNs, we can actually mix players of different types in the population,
  2. make them play against each other a certain number of games,
  3. select the ones with more wins and discard the others,
  4. replace the discarded players either by new random players, either by mutations and crossovers of the best players.
  5. go back to step 2.

Still, with this simple algorithm, there are many possible parameters:

  • the population size,
  • how many individuals to keep? Keep the top x %? Or all the ones managing to have a certain score?
  • how much mutation and crossover percentage should be applied?
  • how many games to play to get a good confidence score on every player?

The supporting UI

To evaluate the impacts of these parameters, I then built an UI on top of this to observe the evolution of the population and see how the best individuals evolve. The UI is made of a simple table, sorted by “performance” (that’s to say the percentage of wins). Every row shows one individual, its ranking, its age (since a single individual can survive for multiple generations), its original parent, and the number of total mutated generations it comes from.

Later, I also added at the bottom of the screen the progression of the score of the best individuals.

Here is a simple screenshot:

The green part represents the individuals that will be selected for the next generation. All individuals in red will be discarded. The gray ones are non NN implementations that can be used as “benchmarks” against the NN implementations. When the first population is created randomly, they are generally beaten very easily by those standard implementations, but we can see that after some iterations, the NNs selected one generation after the other end up beating those standard implementations. We’ll dig into that in the next post, along with the choice of the different parameters.

Next comes part 5.

Installing a working Python environment and Silkaj on a Raspberry Pi 3 with Raspbian Jessie

Raspberries are awesome. But setting up things can sometimes be a little messy. I wanted to install a working version of Silkaj (see the Duniter project, if you don’t know them yet, check them out, they rock!) and here is a full tutorial to get you going.

Requirements:

  • a Raspberry Pi (mine is a version 3 but it should probably work on a 2 as well),
  • Raspbian Jessie, but it would probably work on any other raspbian or even any Debian-based distribution,
  • networking (obviously).

Required packages

You will need to have libsodium and libffi already installed, as well as libssl and its development package, otherwise install them:

sudo apt-get install libsodium13 libsodium-dev libffi6 libffi-dev libssl-dev

Note that you do need the development packages because python’s installer will need to compile some dependencies with them later.

Check where libffi.pc has been installed:

find /usr -name "*libffi.pc*"

You need to add the path for libffi.pc to the python environment variable PKG_CONFIG_PATH. Check if that variable is empty or not, if it’s not empty, you need to APPEND the following instead of overwriting it of course (change the location of libffi.pc to the result of your previous command):

export PKG_CONFIG_PATH=/usr/lib/arm-linux-gnueabihf/pkgconfig/libffi.pc

Installing Python 3.6 and pipenv

Because silkaj and its dependencies doesn’t run well with older versions of python, you need to install Python 3.6. Here is the recipe:

wget https://www.python.org/ftp/python/3.6.0/Python-3.6.0.tgz
tar xzvf Python-3.6.0.tgz
cd Python-3.6.0/
./configure
make
sudo make install

The following needs to be done as root or with sudo (unless you want to install for your user only):

sudo python3.6 -m pip install --upgrade pip
sudo python3.6 -m pip install pynacl
sudo python3.6 -m pip install pipenv

Get Silkaj and prepare it

Type the following in your shell with any user:

git clone https://git.duniter.org/clients/python/silkaj.git
cd silkaj
pipenv install
pipenv shell

This last command actually starts a new shell in which silkaj can be run.

That’s it! You’re ready to run silkaj now:

./silkaj